Planet For Application Life Development Presents
MY IT World

Explore and uptodate your technology skills...

Content
Powerpoint - Add A Sound File To An Object
Powerpoint - Add Sound
Powerpoint - Animation Painter
Powerpoint - Animations
Powerpoint - Artistic Effects
PowerPoint - Backgrounds
Powerpoint - Backstage View
Powerpoint - Bokeh Backgrounds
Powerpoint - Charts
Powerpoint - Compress A Presentation
Powerpoint - Convert Video
Powerpoint - Convert Video Using Camtasia
PowerPoint - Converting Text To SmartArt
Powerpoint - Create A Quiz
PowerPoint - Create A Speech Bubble
PowerPoint - Create A Template
PowerPoint - Create A Theme
PowerPoint - Create Animated Backgrounds
PowerPoint - Creating Shapes
PowerPoint - Curved Text
Powerpoint - Developer Tab
PowerPoint - Embed Your Website
PowerPoint - Embed Videos From Your Hard Drive
PowerPoint - Embed Youtube Videos
PowerPoint - Extract The Background Image
PowerPoint - Formatting Video
Powerpoint - Handouts
PowerPoint - Hyperlink
PowerPoint - Insert A Table
PowerPoint - Insert An Excel Spreadsheet
PowerPoint - Insert Images
PowerPoint - Key Tips
PowerPoint - Make Sound Start Automatically
PowerPoint - Notes
PowerPoint - Open PPT Or PPTX Files
PowerPoint - Paste
PowerPoint - Calendars
PowerPoint - Transparent Text
PowerPoint - Viewer
PowerPoint - Presentation Views
PowerPoint - Remove The Background From An Image
PowerPoint - Rotating Text
PowerPoint - Save As PDF
PowerPoint - Selections
PowerPoint - Shapes
PowerPoint - Slide Layouts
PowerPoint - Slide Transitions
PowerPoint - Speech Bubbles
PowerPoint - Template
PowerPoint - The Ribbon
PowerPoint - Themes
PowerPoint - Clip Art
PowerPoint - Venn Diagram Template
PowerPoint - Video
PowerPoint - What Makes A Good PowerPoint Presentation
PowerPoint - WordArt

Powerpoint - Compress A Presentation

By far the biggest culprit when it comes to making huge PowerPoint file sizes is multimedia. The addition of a few high resolution images and also audio or video clips can send the size of your presentation through the roof. Not only do large files take up more space on your hard drive or memory stick, they take longer to email and slow down the playback performance of your presentation.

Fortunately, there is a way for us to compress our PowerPoint presentations.

On the File tab, click Info, and then in the Media Size section, click Compress Media.

Media Size And Performance In PowerPoint 2010

A panel will open that gives you choices to make about how drastically you want to reduce file sizes – and quality of the media in your presentation. The more you reduce file size, the lower the quality becomes.
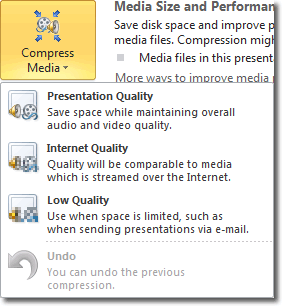
Compress Media - Lower Quality

The following descriptions of each option will help guide you in your decision:

  • Presentation Quality – Save space while maintaining overall audio and video quality.
  • Internet Quality – Quality will be comparable to media which is streamed over the Internet.
  • Low Quality – Use when space is limited, such as when you are sending presentations via e-mail.

It may be necessary to try each of these options to get the required balance of quality and file size. Fortunately you can always use Ctrl-Z to revert to the previous condition of your media files if you mess up! Choosing the Low Quality option, for example, may (and often does) produce a video that is too low in quality to be presented to an audience.

Note that the Compress Media option in backstage view only becomes available when there are audio or video clips in your presentation. You could have hundreds of high resolution images on your slides, all eating into your hard disk space, and still that Compress Media button wouldn’t show. It only knows to come out when there are audio or video files to compress.